
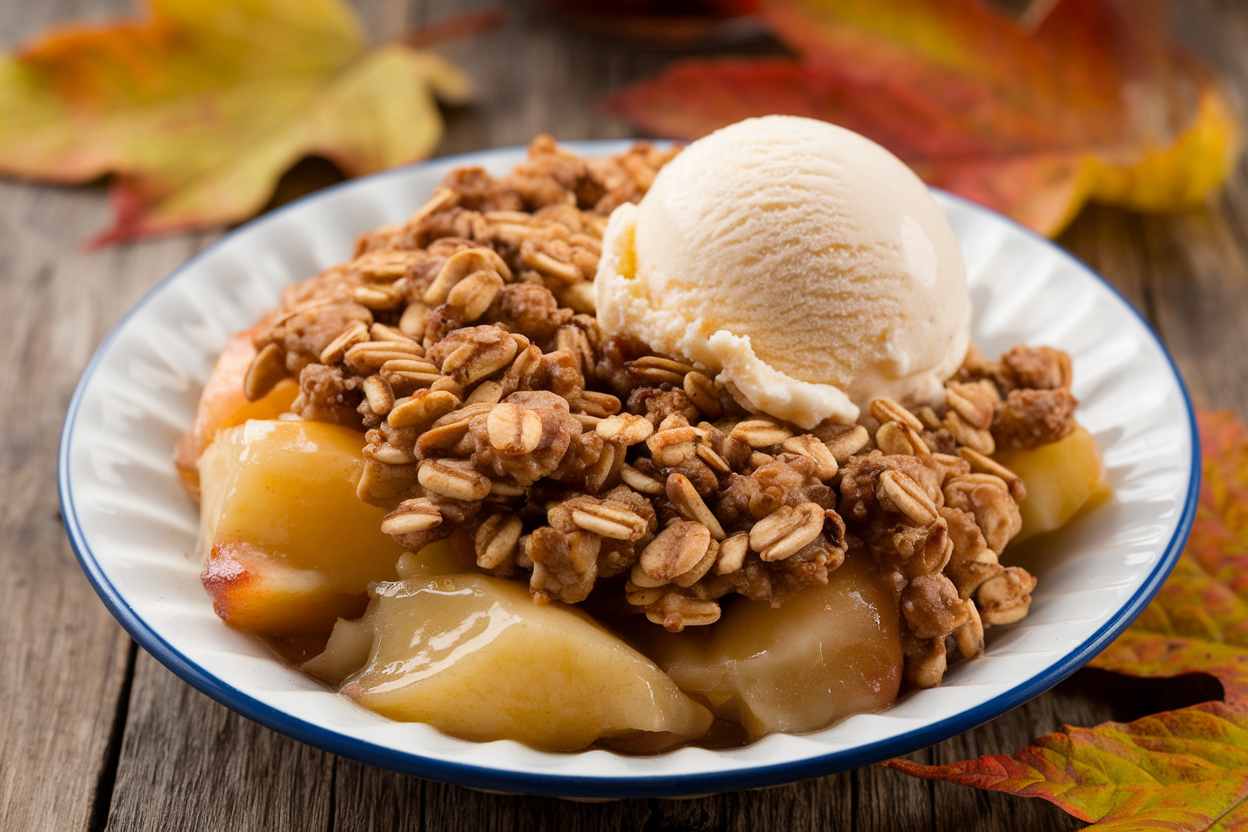
You know that moment when the air turns sharp, sweaters come out, and suddenly apples taste like they have a purpose? That’s your cue. This apple crisp takes zero chef swagger, makes your house smell like a bakery, and delivers crunch, warmth, and buttery bliss in every bite.
No fussy crusts, no weird tools—just golden oat topping, tender apples, and a quick victory lap. Bake it once, and you’ll “accidentally” buy 10 pounds of apples every weekend. Your future self will thank you.
Table of Contents
Feeling foggy, stuck, or emotionally off?
- • Trouble focusing or feeling scattered
- • Low energy or emotional drive
- • Feeling disconnected or stuck
These tools can help you reset, refocus, and reconnect:
- 🔋 Mitolyn
- Cellular energy & mitochondrial support
- 🌙 SleepLean
- Restful sleep & metabolic balance
- 💧 ProstaVive
- Prostate comfort & urinary support
What Makes This Recipe So Good
Perfect texture contrast: The apples turn soft and jammy while the oat crumble bakes into a golden, crunchy topping that shatters beautifully with each spoonful.
Balanced sweetness: A blend of brown sugar and a touch of maple syrup keeps it rich, not cloying, with a caramel vibe that tastes like fall in a bowl.
Foolproof technique: We pre-season the apples and use just enough thickener so the filling isn’t watery.
The topping stays crisp, even on day two. Yes, really.
Flexible and pantry-friendly: Swap apples, adjust spices, use gluten-free oats—this recipe doesn’t throw a tantrum if you improvise.
Fast payoff: Minimal prep, big flavor, and the kind of aroma that makes neighbors “just happen” to stop by.
☕ Transform Your Coffee Into a Wellness Ritual
Smarter caffeine habits, mindful routines, and fat-burning brew strategies.
🌞 Morning Routine — Burn More Fat
🧪 Science Behind Your Sip — Does Coffee Help?
Ingredients Breakdown
- Apples (8 cups, about 7–8 medium): Use a mix—Granny Smith for tartness + Honeycrisp or Fuji for sweetness and texture.
- Lemon juice (1 tablespoon): Brightens the filling and keeps apples from browning.
- Granulated sugar (2 tablespoons): Light sweetness without weighing the apples down.
- Brown sugar (1/3 cup, packed): Adds molasses depth to the filling.
- Maple syrup (1 tablespoon, optional): Subtle fall flavor booster.
- Cornstarch (1.5 tablespoons): Thickens juices for a glossy, non-soupy filling. Arrowroot works too.
- Ground cinnamon (1.5 teaspoons): Classic warmth.
Use good quality—it shows.
- Ground nutmeg (1/4 teaspoon): Adds cozy complexity.
- Salt (1/4 teaspoon): Wakes up the sweetness.
Oat Topping
- Old-fashioned rolled oats (1 cup): For that crisp, toasty crunch. Don’t use instant.
- All-purpose flour (3/4 cup): Helps the topping clump and crisp. Gluten-free blend works in a pinch.
- Brown sugar (1/2 cup, packed): Sweetness plus caramel notes.
- Chopped nuts (1/2 cup, optional): Pecans or walnuts for extra crunch and flavor.
- Unsalted butter (8 tablespoons/1 stick), cold and cubed: The secret to sandy crumbles that bake up golden.
- Vanilla extract (1 teaspoon): Rounds out the topping flavor.
- Salt (1/4 teaspoon): Non-negotiable for balance.
To Serve
- Vanilla ice cream or whipped cream: Not optional, let’s be honest.
- Extra cinnamon or caramel drizzle (optional): For drama and delight.
How to Make It – Instructions
- Preheat and prep: Set oven to 350°F (175°C).
Butter a 9×13-inch baking dish (or two 8x8s if sharing—generous, IMO).
- Slice the apples: Peel if you prefer a softer filling. Core and slice into 1/4-inch wedges. Consistency matters for even baking.
- Season the filling: In a large bowl, toss apples with lemon juice, granulated sugar, brown sugar, maple syrup (if using), cornstarch, cinnamon, nutmeg, and salt.
You want everything lightly coated.
- Make the oat topping: In another bowl, combine oats, flour, brown sugar, nuts (if using), and salt. Add cold butter cubes and cut in using a pastry cutter or fingers until clumpy, pea-sized bits form. Stir in vanilla.
- Assemble: Spread apples evenly in the baking dish.
Sprinkle the topping evenly, covering every inch. No bald spots.
- Bake: 40–50 minutes, until the topping is deep golden and the filling is bubbling around the edges. If the top darkens too fast, tent with foil for the last 10 minutes.
- Rest: Cool for 15–20 minutes.
The juices thicken as it sits, which is code for “don’t rush this.”
- Serve: Scoop into bowls, add ice cream, and prepare for silence at the table.
Preservation Guide
- Room temp: Covered, up to 1 day if your kitchen isn’t hot. The topping stays crisp best this way.
- Refrigerate: Up to 4 days in an airtight container. Re-crisp in a 350°F oven for 10–12 minutes; microwaving softens the topping (still tasty, less crunchy).
- Freeze (unbaked): Assemble in a freezer-safe dish, wrap tightly, and freeze up to 2 months.
Bake from frozen at 350°F for 55–70 minutes, tenting as needed.
- Freeze (baked): Cool completely, wrap well, and freeze up to 2 months. Reheat covered at 325°F for 20–25 minutes, then uncover 5–10 minutes to re-crisp.
Health Benefits
- Fiber from apples and oats: Supports digestion, helps satiety, and stabilizes energy. Dessert with a side of common sense.
- Micronutrients: Apples bring vitamin C and polyphenols; cinnamon may help with glucose response—small but helpful.
- Smart fats (if using nuts): Walnuts and pecans contribute omega-3s and antioxidants.
- Balanced indulgence: This isn’t a salad, but swapping crust for oats cuts refined flour compared to pie.
Progress > perfection, FYI.
Common Mistakes to Avoid
- Using the wrong apples: All-soft varieties can turn mushy. Mix tart and sweet for flavor and structure.
- Skipping the thickener: No cornstarch = soupy filling. You want glossy, not watery.
- Warm butter in topping: Melted or soft butter leads to greasy, cakey topping.
Keep it cold for proper crumbles.
- Overcrowding slices: Slices too thick don’t soften; too thin can disintegrate. Aim for 1/4-inch.
- Not letting it rest: Cutting in too early releases liquid. Give it 15 minutes, hero.
Mix It Up
- Pear-apple mash-up: Swap 2 cups apples for ripe pears; add a pinch of cardamom.
- Ginger snap crunch: Replace 1/4 cup flour with crushed gingersnaps for spicy snap.
- Salted caramel: Drizzle 2–3 tablespoons caramel over the apples before topping; finish with flaky salt.
- Gluten-free: Use certified GF oats and a 1:1 GF flour blend.
- Lower sugar: Reduce brown sugar in filling to 2 tablespoons and in topping to 1/3 cup; use extra cinnamon and vanilla for flavor.
- Cran-apple zing: Add 1/2 cup dried cranberries to the filling for tart pops.
- Brown butter upgrade: Chill browned butter until firm, then cube and use in topping for nutty depth.
Extra work, big payoff.
FAQ
What are the best apples for apple crisp?
A mix of Granny Smith (tart, holds shape) and Honeycrisp, Fuji, or Braeburn (sweet, juicy) gives the best balance. All one type works, but mixing is the flavor cheat code.
Can I make this ahead?
Yes. Assemble the apples and topping separately, refrigerate both up to 24 hours, then combine and bake.
Or assemble fully and refrigerate for up to 12 hours; expect a few extra minutes of bake time.
How do I keep the topping crisp?
Use cold butter, don’t overmix, and bake until deeply golden. Reheat leftovers in the oven, not the microwave, to revive the crunch.
Is cornstarch necessary?
It helps the apple juices thicken so the crisp isn’t soupy. You can sub 2 tablespoons flour or 1 tablespoon arrowroot.
Adjust slightly if your apples are super juicy.
Can I reduce the sugar?
Absolutely. Cut the filling sugar by half and the topping by a few tablespoons. The texture stays solid, and the spices still deliver.
Taste your apples first—sweet apples need less.
What if I don’t have oats?
Use additional flour and add chopped nuts for texture. It becomes more of a streusel than a classic crisp, but still delicious.
How do I know it’s done?
The edges should be bubbling, the apples should be tender when pierced with a knife, and the topping should be deep golden. If the apples are still firm, give it 5–10 more minutes.
In Conclusion
This Apple Crisp Fall Dessert Recipe with Oat Topping is the no-stress, high-impact dessert that turns ordinary apples into a crowd-pleasing knockout.
It’s crunchy, warm, and sweet in all the right ways—and forgiving enough for busy nights. Keep oats and apples on hand, and you’re one hour away from peak fall energy any day of the week. Now go claim your hero status with a scoop of vanilla on top.
You’ve earned it.
Printable Recipe Card
Want just the essential recipe details without scrolling through the article? Get our printable recipe card with just the ingredients and instructions.